Kubernetes - How it Works
If you’ve ever worked with microservices, you know how tedious they can be to manage in a live production environment. Do you need to roll back an update or restart an unreachable service? Do you have enough running instances to handle traffic? Are you running too many instances and thereby wasting resources? Is one instance mysteriously consuming too much CPU or memory? Do you need to migrate a running instance to another machine?
And that’s just for one microservice. The more microservices we have, the more difficult this balancing act becomes.
Traditionally, we software developers like to throw this monumental task at system administators and absolve ourselves of responsibility, but I’m going to show you a better way.
Container orchestration
In a previous blog post, I described how certain Linux features are used by the Docker platform to create and run containerized applications. Why don’t we just containerize our microservices with Docker?
Indeed, containerization alleviates much of the problems of old, especially with regards to dependency management and resource utilization on a single machine, but we still need a way to smoothly and efficiently deploy, manage, and scale these running containers with minimal supervision. That’s where container orchestration software comes in.
In this blog post I will describe how container orchestration works using the Kubernetes platform. It would be ideal if you already have some working experience with Kubernetes before reading this, but as usual, I’ll try to keep things simple and easy-to-read; don’t forget that you can find details and clarifications in the footnotes.
Kubernetes
Kubernetes (K8s) is an open-source container orchestration platform introduced by Google in 2014.
K8s abstracts away the underlying machines running our containers and presents them to us as a single monolithic resource. Its goal is to automate the scheduling and configuration of our containers across machines with minimal effort or supervision by a system administrator.
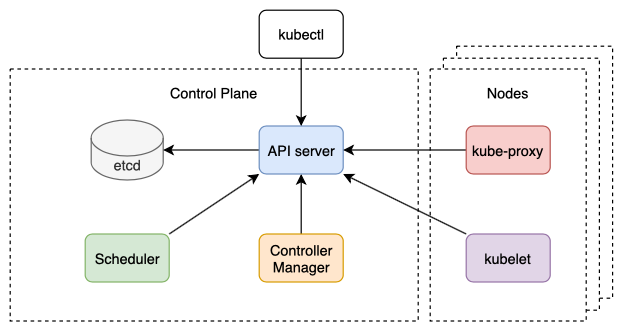
A typical K8s deployment results in a cluster of components that can be divided into two main categories: the Control Plane (i.e. master) and the Nodes (i.e. worker machines that actually run our containers).

Note that kubectl in the diagram above is a prominent CLI client used for controlling the cluster.
Control Plane
The Control Plane is the “brains” of the cluster, making important global decisions to achieve a desired overall state. It consists of the following components: API server, etcd, the Scheduler, and the Controller Manager.
API server
The API server is the frontend that handles all operations and communications between internal components and external user commands. It exposes the Kubernetes API which enables the reading and writing of Kubernetes objects via REST API endpoints1.
The API server also provides a watch mechanism by which clients can watch for changes to resources using HTTP long polling2.
The default implementation for the API server is kube-apiserver.
etcd
etcd is a persistent key-value database used for storing configuration data for distributed systems.
It helps to remember that its name originates from the unix /etc directory which is normally used to store configuration data on a single system - just add the suffix “d” which stands for “distributed”.
In the context of K8s, etcd is used to persist all cluster data and metadata. It also provides the watch API that is used by the API server.

Notice how etcd only ever talks directly to the API server, abstracting away its actual storage mechanism from the API server’s clients.
Scheduler
The Scheduler assigns Pods to Nodes3.
When a Pod is created and has no assigned Node to run on, the API server’s watch mechanism notifies the Scheduler to assign one, which it does by updating the Pod definition (again, through the API server). The API server’s watch mechanism then notifies the Node that it needs to create and run the Pod’s containers.
Notice how everything is communicated through the API server with the help of its watch mechanism. This is a recurring theme with all internal communications between components.
The default implementation for the Scheduler is kube-scheduler.
Controller Manager
The Controller Manager attempts to reconcile the current state of the cluster with the desired state by modifying the resources deployed through the API server.
The Controller Manager is currently compiled into a single binary and runs in a single process, but beneath its surface, there exists a number of independent controller processes4.
Each controller is responsible for tracking at least one type of resource and ensuring objects of that resource come as close as possible to their desired state as specified by their spec field.
For example, the Node controller keeps an updated list of Node objects that are available, deleting the ones that cannot be reached. It also evicts Pods from unreachable Nodes using graceful termination.
Nodes
The Nodes are the worker machines that run the containers. Each Node consists of the following components: kubelet, kube-proxy, and a container runtime.
kubelet
The kubelet makes sure that the containers of a Pod are running.
Recall that the API server’s watch mechanism notifies a Node that it needs to create and run a Pod’s containers. The component that is actually notified on that Node is the kubelet.
The kubelet creates and runs containers by talking to the Node’s container runtime (e.g. Docker, rkt, or CRI-O). It then continues to monitor each container’s running status, periodically reporting it to the API server.
The kubelet also restarts containers when their liveness probe fails, and terminates them when their Pod has been deleted5.
kube-proxy
kube-proxy is a network proxy that runs on each Node to make sure clients can bind to Services6. In other words, it forwards UDP, TCP, and SCTP packet streams to their respective Service endpoints.
kube-proxy supports three proxy modes - userspace, iptables, and IPVS.
Each mode offers a slight variation in the way traffic is forwarded, but in all three modes the general procedure is:
- kube-proxy watches the API server for changes to Services
- When a Service has been created, kube-proxy defines it a Virtual IP Address (VIP)
- Service clients connect to the VIP and their requests are automatically forwarded to the appropriate endpoint
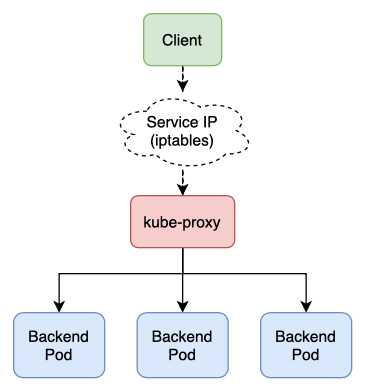
In userspace mode, kube-proxy actually a runs a proxy server process in userspace.

When a Service is created (as notified by the API server), kube-proxy opens a new randomly chosen port on its local Node and uses iptables to redirect traffic to it from the Service IP. It then forwards that traffic to a backend Pod7.
Note that in this mode, the original client IP is lost during the redirect, rendering some firewalls useless.
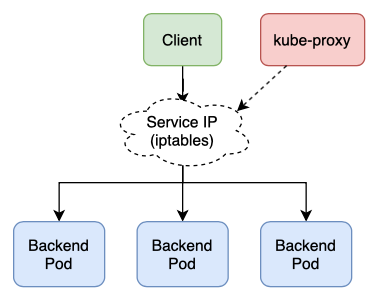
In iptables mode, kube-proxy uses iptables (a userspace tool for defining packet processing logic in Linux) to forward traffic from the Service IP to a backend Pod directly, without the need for a userspace proxy8.

This way it avoids having to move packets between kernel space and userspace, giving it a major performance advantage over userspace mode while increasing transmission reliability; it also preserves the client IP address.
Note that if the backend Pod fails to respond in this mode, the connection fails. Whereas in userspace mode, kube-proxy would automatically retry the connection with a different backend Pod.
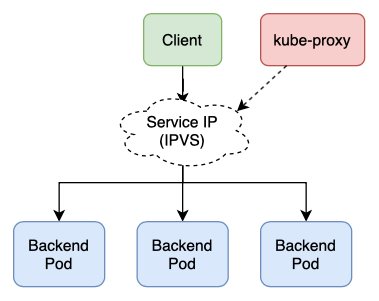
In IPVS mode, kube-proxy uses IPVS (a Linux kernel feature for transport-layer load balancing) to forward traffic from the Service IP to a backend Pod9.

Unlike iptables, IPVS runs in kernel space and uses a hash table as its underlying data structure; thus increasing its performance.
-
A Kubernetes object is a persistent entity that describes the “desired state” of a resource in your cluster. You typically define that desired state by setting the object’s
specfield. ↩ -
HTTP long polling is a “push emulation” technique whereby the client sends the server a request with the expectation that the server may not respond right away. When the client receives the response it immmediately sends the server a new request. ↩
-
A Pod is a collection of one or more containers that are guaranteed to be located on the same Node, with shared storage and network resources. It’s the smallest deployable unit in K8s. ↩
-
See its repository for a list of controllers and source code. ↩
-
A liveness probe detects when a containerized application has transitioned to a broken state and connot recover unless being restarted. ↩
-
A Service is an abstraction layer above a set of backend Pods that serves to decouple their IP addresses and ports from frontend clients. ↩
-
Userspace mode chooses a backend Pod via a round-robin algorithm by default. ↩
-
iptables mode chooses a backend Pod by random by default. ↩
-
IPVS mode provides a variety of options for how it chooses a backend Pod. Examples include round-robin, least connection, and destination hashing. ↩